By Becky Dimock / Edited by Samantha Bellerose, B.Ed, Dip.Dance (Performing Arts)
It’s so exciting when your daughter gets her first pair of pointe shoes, but it can also be stressful. She’s gotten the stretch ribbons and elastics sewn on, but what are they actually for? How should she tie them so they do what they’re supposed to do? We will describe the two most common ways to tie Stretch or Elastic pointe shoe ribbons. She should choose the method that’s best for her.

First, it’s important to understand that ribbons serve two purposes. Of course, they help keep the shoe on the foot. But more importantly, they provide support for her ankle. Thus, tying shoes incorrectly can damage the shoe, make them wear out more quickly, or cause injury.
What you will need?
Your dancer needs to have her ribbons and elastics sewn on their pointe shoes to begin with. To see how to do that in our tutorial here (Pointe shoe ribbons coming soon – in the mean time we have a tutorial on how to sew them onto flat ballet shoes you can read or watch here.)
Why use Elastic Ribbons?
In this article, we are using elastic ribbons – which are a relatively new product – traditionally satin ribbons without any stretch were used. Using standard satin or elastic ribbon is a personal preference.
Some people feel that satin ribbons give better ankle support because they have very little give in the material, really holding the ankle in place. But because they are rigid some dancers find them painful especially on their archilles tendon. However elastic ribbons are softer and more supple and we find if they are tied properly as I show in this tutorial, elastic ribbons gives plenty of support for pointe work.
Extra elastic loop for support


You will also notice that our pointe shoes have one loop of elastic sewn into them as well as the elastic ribbons. It is good to note that this elastic is different to the elastic ribbons. The elastic I am referring to is a wide piece of elastic (around 3/4″) that I attached to my daughter’s shoe. Many dancers like my daughter who do not dance full time every day, add in a loop of elastic or even two crisscrossed pieces that aid in keeping the pointe shoe snuggly pulled to the foot (some dancers use only the elastics with no ribbons).
You can choose to not use these elastics (you would rarely see them on stage at a professional company show) but for the non-professional dancer who only trains several times a week, the elastics offer extra support – which can be important in helping to prevent injury, increasing stability and confidence.
Should You Use Two Elastic Ribbons or One Long looped Elastic Ribbon?
Additionally, we describe how to tie shoes using two shorter ribbons or one long ribbon. Again, it’s a personal preference to use one or two ribbons. However, new dancers should use two ribbons until they get a good feel for how the shoes should feel when they’re tied properly. Otherwise, they might make their one ribbon too long, too short, or put it in the wrong position. Of course, using one ribbon only works with elastic ribbon.
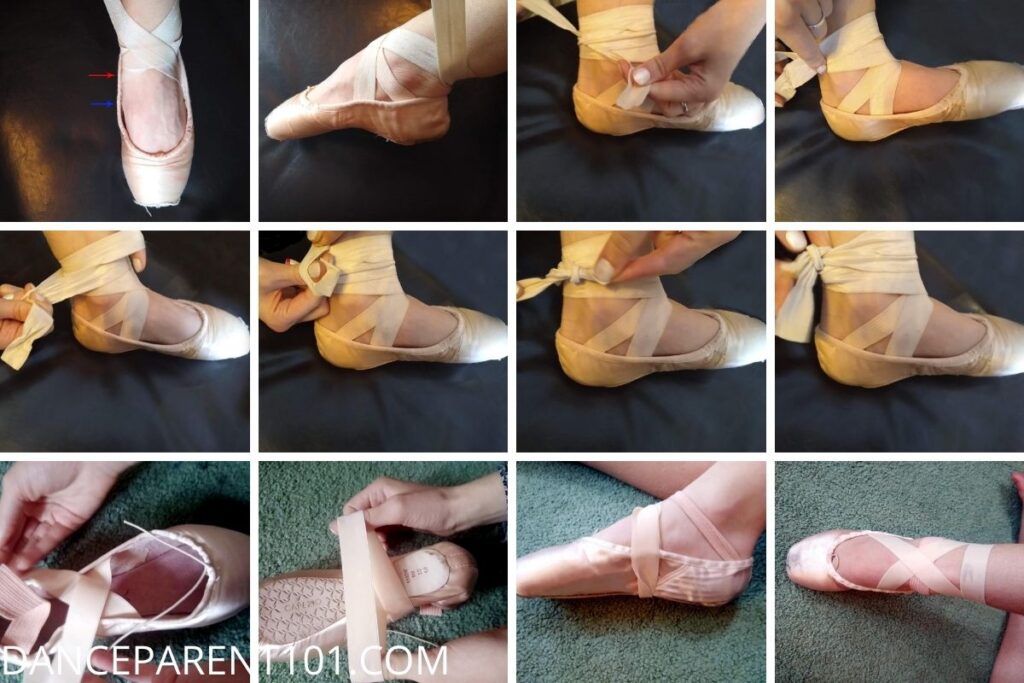
Step by Step Instructions Using Two Ribbons
Step 1 – Cross the Ribbons over the Front of the Ankle.
Put the pointe shoe on your dancer. While she stretches (points) her foot, cross the ribbons in front. Be sure to keep the ribbons flat and snug to the foot.


Step 2 – Cross them Over the Back of the Ankle
Take the elastic ribbons around the back of the ankle and cross them over changing them to the other hand. You will be crossing the ribbons behind the achilles tendon.
Again, keep them flat and snug to the ankle. Don’t let them twist.
When using elastic ribbons it is best to keep the foot pointed during this part as well. If you were using satin ribbons, you would not have your dancer pointe their foot. Rather the dancer should flex their foot when crossing in back to help keep the ribbons flat.

Step 3 – Wrap the Uutside Ribbon Around once to Meet the Inside Ribbone
Bring the “outside” ribbon around the front of the ankle to meet the “inside” ribbon right behind the ankle bone.


Step 4 – Find the Most Comfortable Place to Tie the Ribbons.
It is important to find the right location for tying your ribbon.
The photo below shows how the inside and outside ribbons meet just behind the ankle bone that sticks out, but before you reach directly to the back. You will find there is a small natural indentation here in your dancers foot! This recess in the ankle is the pefect hiding place for your knot.
Important: Do not tie the knot on the back of your dancer’s foot because it could damage her Achilles tendon.


Step 5 – Optional – Wrap your Elastic Ribbons around a Second Time.
Optionally wrap the outside ribbon a second time. In the image, a finger is placed under the original ribbon to help show what’s going on. When actually tying the shoe, keep all ribbons flat and snug the entire time. If your dancer ties her shoes this way, one ribbon will be quite a bit longer than the other.
Some dancers can wear their pointe shoes on either foot, depending on their toe pads and foot shape. If such a dancer plans on wrapping her ribbons twice, her shoes will no longer be interchangeable.


The following sequence is then followed
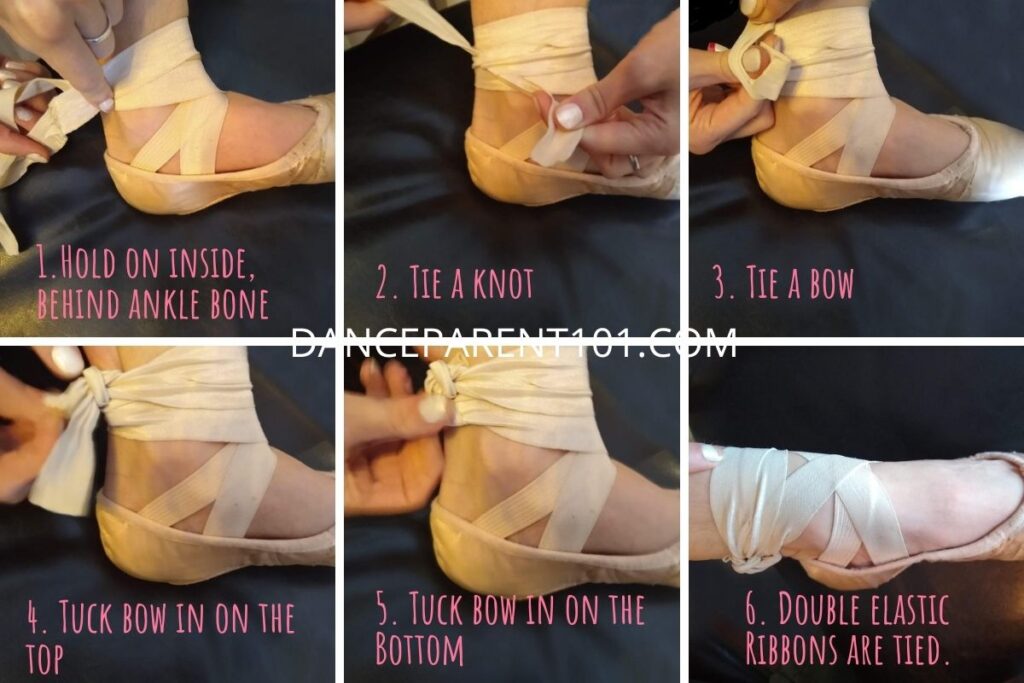

Step 6 – Tie your Knot and Bow
But to break it down – Tie the ribbons in a slip knot and a bow (bunny ears).


Step 7 – Tuck in the ends of the Ribbons to Hide the Bow Ears for a Clean Look.
Tuck in the ends of the ribbons. This looks cleaner. It won’t impact her dancing in any way, but they should be kept tucked in. Especially in a performance, competition, audition, intensive, master class, etc.


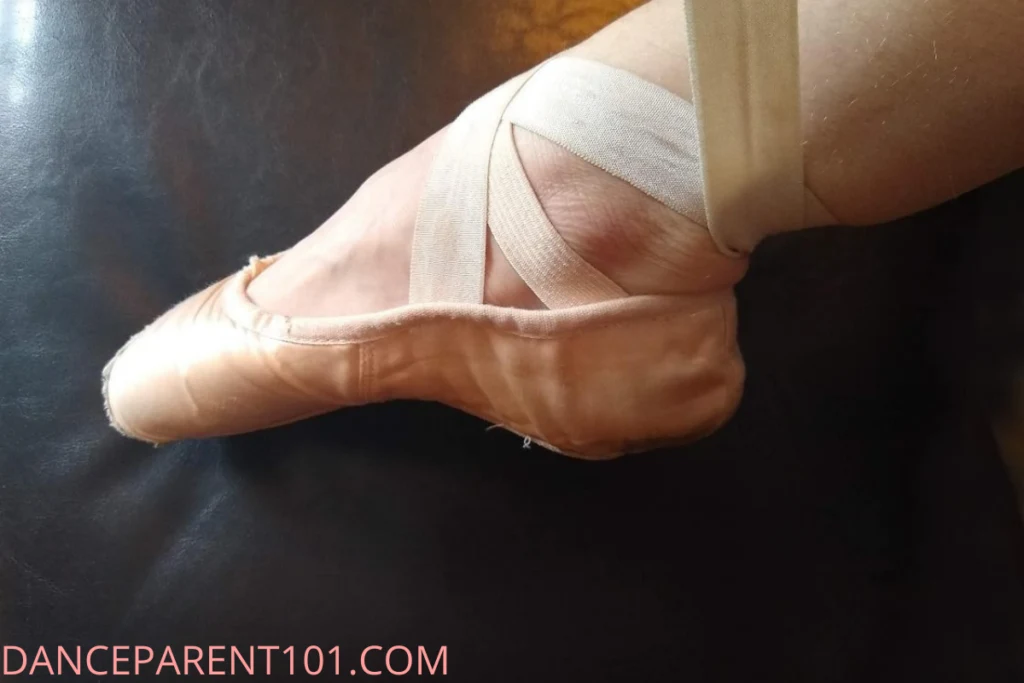
Finished Product
When the foot is stretched, the ribbons should lie flat. If using elastic ribbons, they will also lie flat when flexed, but satin ribbons might not lie perfectly flat, depending on where they are sewn:


Step by Step Instructions Using One Elastic Ribbon
Once your dancer gets the hang of it, she will be able to get her shoes on very quickly by using this method. She will never have to worry about tie ends coming out, having the knot in the wrong place, or making her ribbons too tight or too loose.
The key to using one elastic ribbon is to wrap them properly when putting them away, so we will start by showing how to wrap the ribbons when the dancer takes her shoes off.
Step 1 – Crisscross the Ribbon over the top of the shoe.
It is really important at this stage to untangle the ribbons and seperate them from the elastic loop that may be sewn onto the pointe shoe. Make sure the ribbons are not twisted!


Step 2 – Turn the Pointe Shoe Over and Crisscross the Ribbon Underneath:
Being super careful to not twist the ribbons, cross them over in your hands.


Step 3 – Bring the Big Loop over the Top to the Front of the Pointe Shoe.
That loop you just made on the back, bring it forward over the top of the pointe shoe, so it comes all the way over to the front.
Stop here if the shoes are being put away. Continue with the next step if the shoe is being put on.


Step 4 – Slide your Foot into the Shoe – Under ALL the Elastics & Ribbons.
Put your toe pad or anyother protective toe coverings on. Then Carefully slide (or push) the the toe pad foot in the hole between the sole of the shoe and the elastic loop and elastic ribbons you just set in place in the previous steps.
You do not have to pull the elastic ribbons into place yet! You can leave these sitting around the arch of your foot while you adjust the elastic loop.


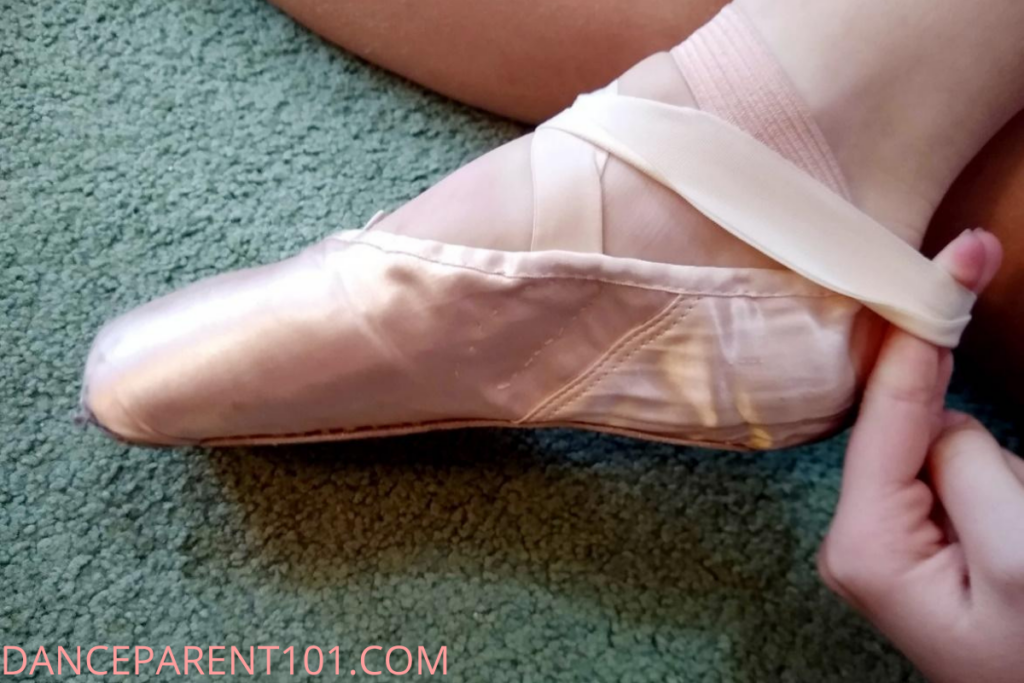
Step 5 – Pull the Elastic Ribbons Over the Heel and Adjust on the Ankle
Once you have your elastic Loop in place, now you can pull the ribbons up and over the heel. Untwist them and straighten everything out!


Step 6 – Finished Product!!!
The ribbons should lie flat and be comfortable around the ankle whether the foot is flexed or stretched:


After taking off the pointe shoes, always be sure to store them properly (for single ribbons follow steps 1-3) and place them into a bag that allows the air to flow in and out. You can take a look at a breatheable bag as well as some charcoal shoe fresheners on our resource page here!
Tips and Tricks
- We buy our elastic and ribbon in large spools, which have lasted several years. This ends up being much less expensive than buying it in little packs, and we always have it when we need it. If you don’t want to buy a whole spool, consider asking your studio director to get a spool and sell it as needed. Otherwise, consider going in on spools with a dancer friend.
- When shoes go dead, you can remove the old ribbon and put it on new shoes, even elastic ribbon. However, you will probably not be able to reuse the elastic since it will likely get stretched out.
- If the heel of your dancer’s pointe shoe falls off when she dances, even when they are properly tied, there are a few things she can try:
- Move the elastic to a more supportive position.
- Pull her heel out of the opening in the bottom of her tights, so the heel of the shoe is against her skin, rather than her tights.
- Rub rosin on the heel of the shoe.
- Try a shoe with a longer heel.
- You will notice that in these pictures, my daughters do not have tights on. They don’t wear tights with their pointe shoes except during performances, but again, that is a personal preference.