I have been sewing my own ribbons onto my ballet shoes since I was a little girl and recently I have been sewing ribbons onto my daughter’s ballet shoes. Sewing ribbons onto ballet shoes takes only minutes and can be done with any type of needle and light-colored thread from your home sewing kit. Try this quick tutorial today – you’ll be glad you did!
To sew ribbons onto ballet shoes you need thread, a needle, leather ballet shoes, ballet ribbons, and scissors. You will basically thread your needle and use a running stitch to attach a ribbon inside both the left and right of the ballet slipper.
Some people like to attach their ballet ribbons by simply sewing one or two rows of stitches across the drawstring casing in line with the stitching already there to secure their ribbons like you see dancers with pointe shoes do them, but they do this mainly because it is quick and they replace their shoes often. I prefer a method that can take a little longer to master but is extremely secure because Your child’s leather ballet shoes will usually be the same ones they use for both classes, rehearsals, and even their performances so not only do you want the end result to look flawless, but you also want them to last – which is why I use the method I do!
What you need:
- Sewing needle
- light colored thread (I double mine to make it stronger)
- scissors
- pinking shears or serated scissors (Optional)
- leather ballet shoes
- Satin ballet ribbons
width: 7/8 inch or between 15-20mm (mine were18mm wide)
length: 2.5Yards/2.2-2.5m long - gas lighter or box of matches
Click on any of the following to go straight to Amazon.com and get everything you need delivered to your door!


Step By Step Tutorial – How to Sew Ribbons onto Ballet Shoes
Enjoy the photos and video tutorial below as we go over each one step by step.
1. Cut your ribbon into four equal lengths

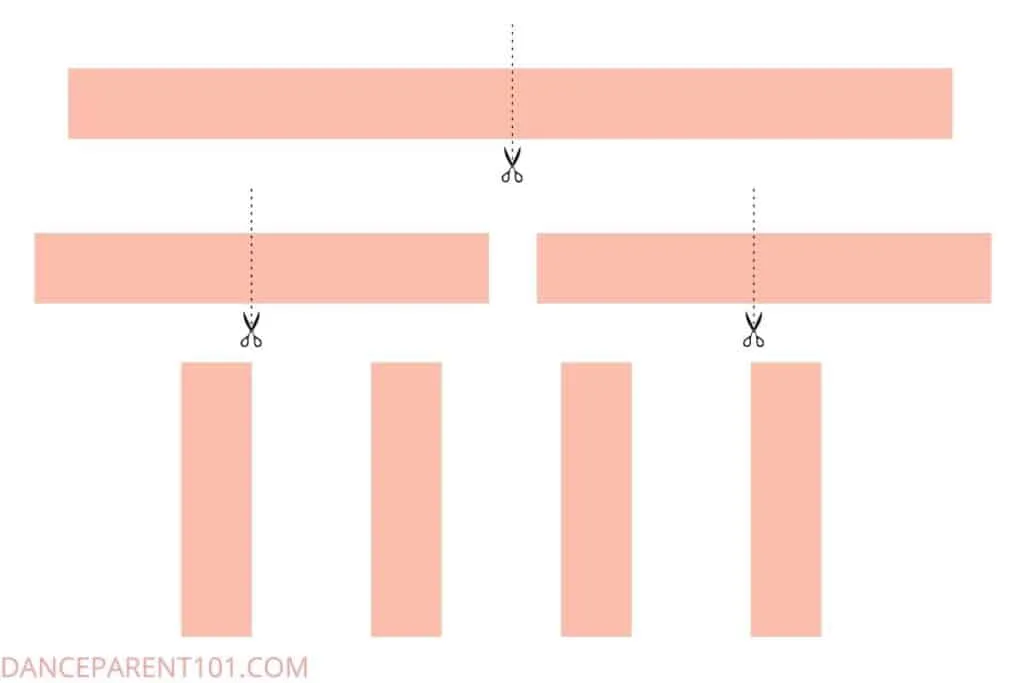
You will need to buy your ribbon from a dance supply store that will generally sell them in lengths of about 2.5yards or 2.2-2.5m. If these ribbons are for a child ballet shoes you will get away with less length and may find yourself cutting off a fair bit at the end of this tutorial – but it is always best to start off with longer ribbons and have to cut them shorter than have them too short and have to buy new ones and sew them on again.
The ribbon you will normally purchase from a dance supplies store for one pair of shoes will come in one long length. So you will need to cut the ribbon in half and then fold it and cut it in half again. If you have pinking shears or serrated scissors you can use these to cut the ribbon into four pieces to help stop it fraying.
2. Thread your needle and make a knot in the thread

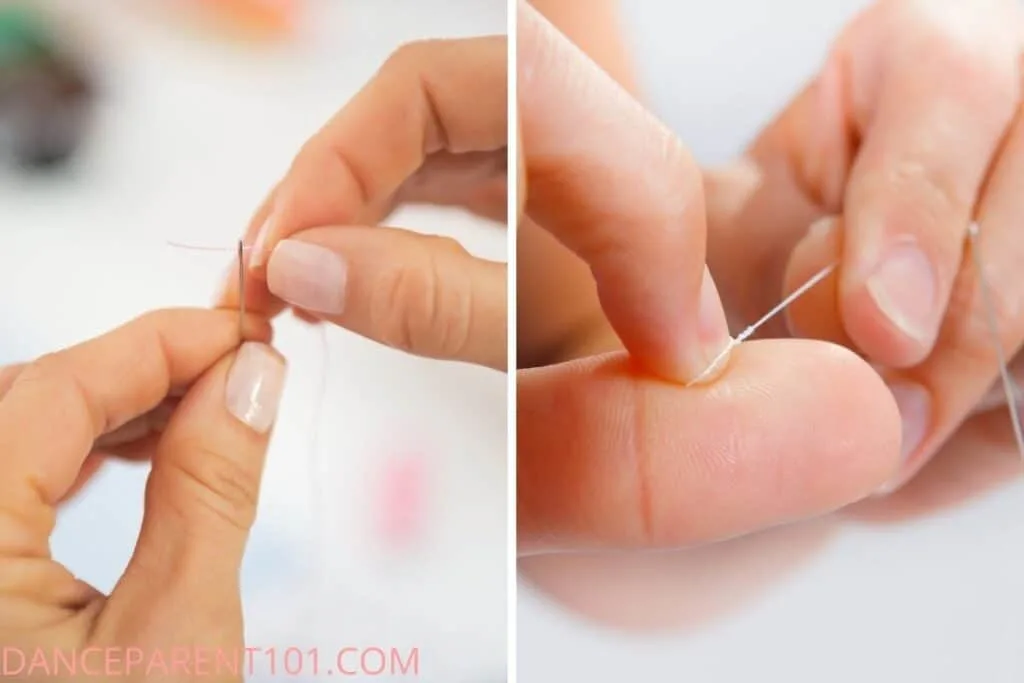
The next step is to thread your ribbon through the eye of your needle. Pull enough thread through to create a double length of thread – this makes your stitches nice and strong. I like to have a length of thread about the length of my arm. Then make a knot at the opposite end of the thread to the needle by wrapping the thread around your finger and sewing the needle through the hole you made with your finger and pulling it closed.
Don’t worry too much if your knot is messy, just cut the ends off as you can hide the knot from view later when you start to sew your ribbon onto the shoe – you can just place the ribbon on top of the knot – also important so the knot doesn’t irritate the foot!
3. Fold one end of the ribbon to prevent fraying
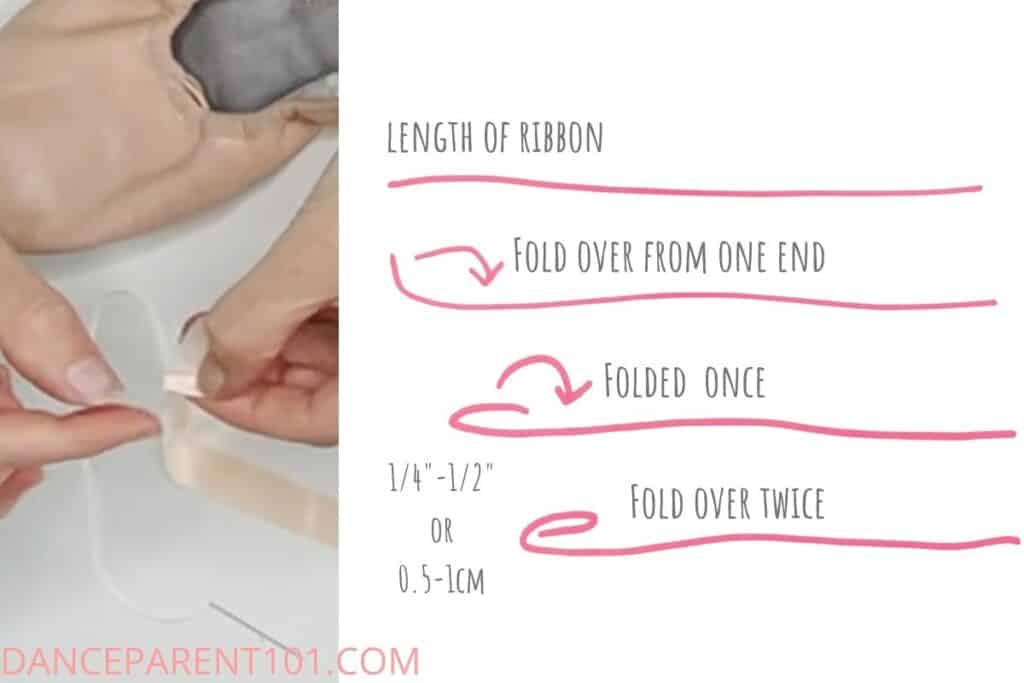
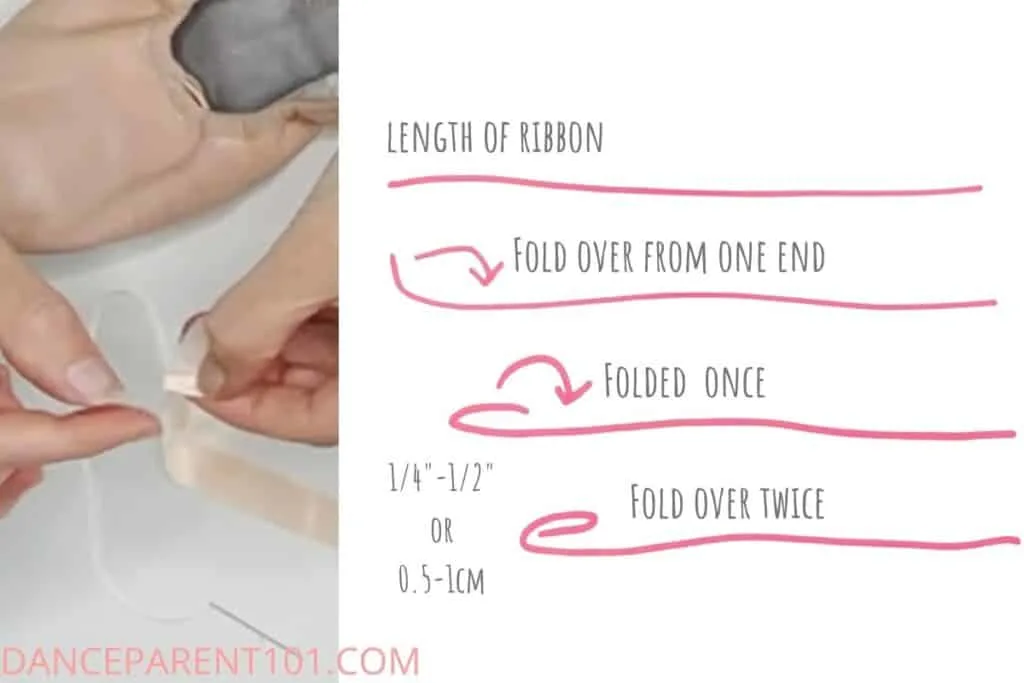
Fold one end of your ribbon about 1/4 inch over and then over again once more and hold this between your fingers. You will be sewing the ribbon onto the shoe with this fold to help prevent fraying and if fraying does occur the folds provide extra length and layers so the ribbons do not come off.
When folding if your ribbons are not double-faced meaning both sides are not shiny, fold into the shiny side as you will attach the ribbon fold down to the shoe and the shiny face will point outwards when being tied.
You could also choose to melt the end of the ribbon here with your lighter and fold once but I find this means you may have trouble getting your sewing needle through the melted parts of the ribbon and as the melted end is hard it can cause discomfort to the side of the foot if not hidden effectively in the fold.
4. Align the first ribbon on the shoe for sewing.
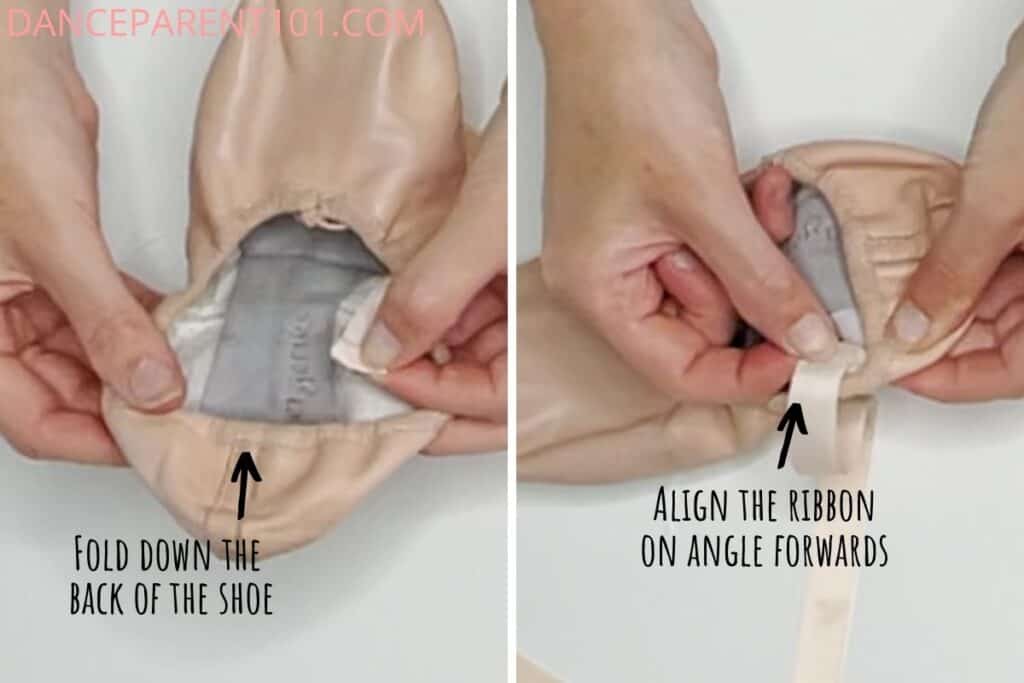

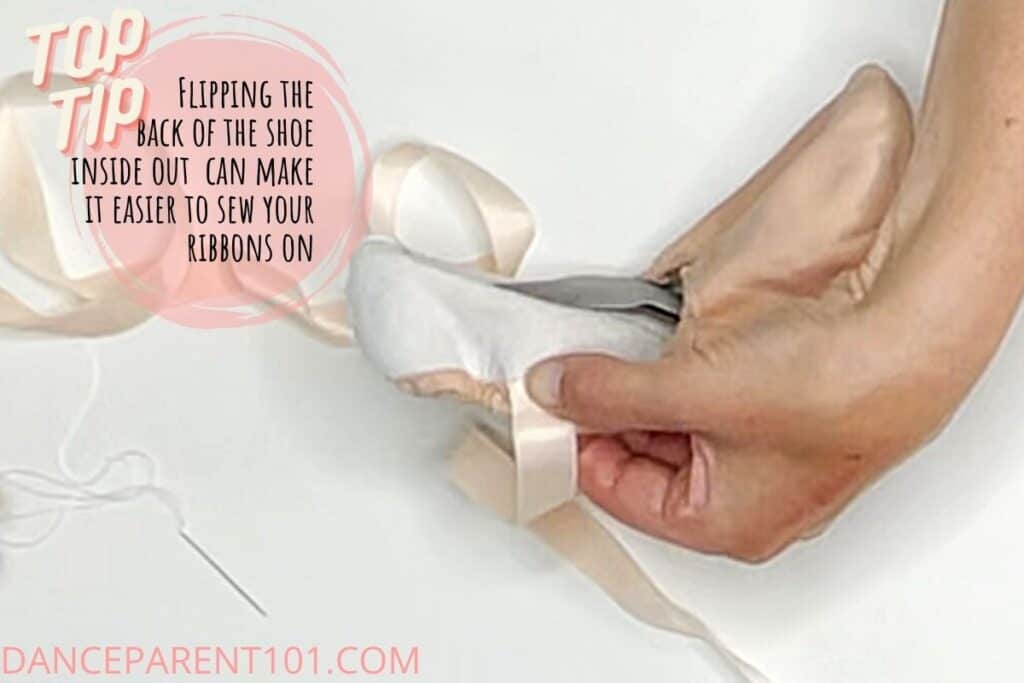
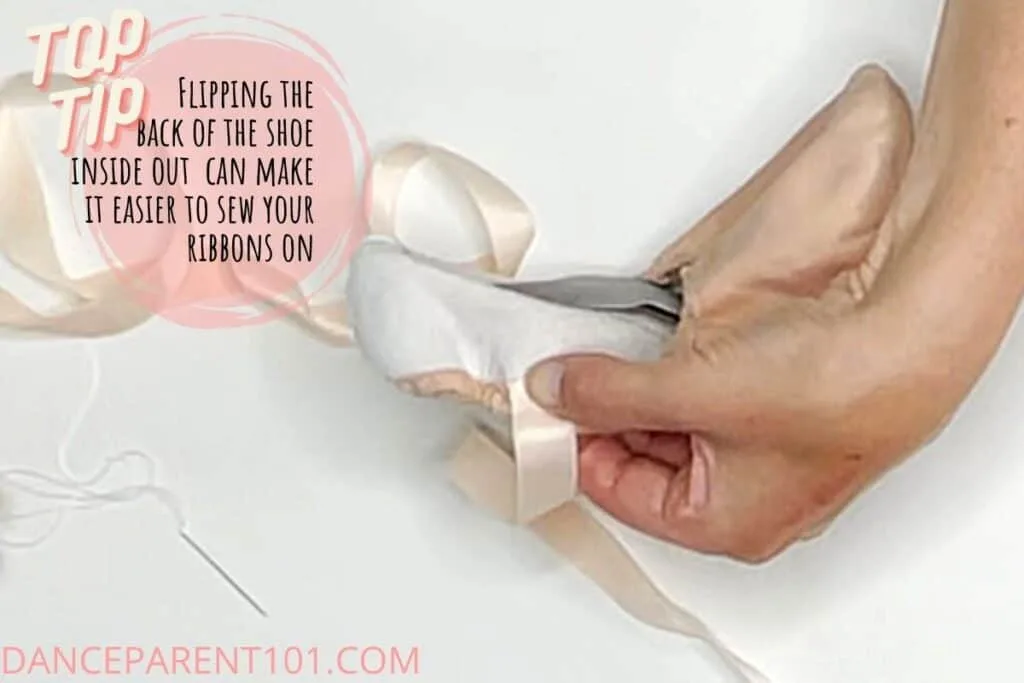
For the perfect placement of your ribbons, press the back of the shoe down toward the sole making it flat. Where the edge of the shoe touches the inside on the fold is the exact place you will need to sew your ribbons.
Place your ribbon at this junction with the fold hidden and closest to the inside of the shoe or facing the inside of the shoe. You will want to angle the ribbon about 60-45 degrees towards the front of the shoe so that it molds to the same shape of the ankle when it is wrapped around it.
#TOP TIP
Some people prefer to bend and flatten the back of the shoe and mark this spot with a pencil which is a great trick and tip to do, but I always end up rebending and flattening the back of the shoe with each ribbon to ensure the placement is correct which kind of makes that step a little redundant – although it can ensure the correct placement throughout the sewing process incase the ribbon moves – which you may not notice but with a pencil mark on inside of the shoe you will!
5. Sew the first ribbon on the shoe.
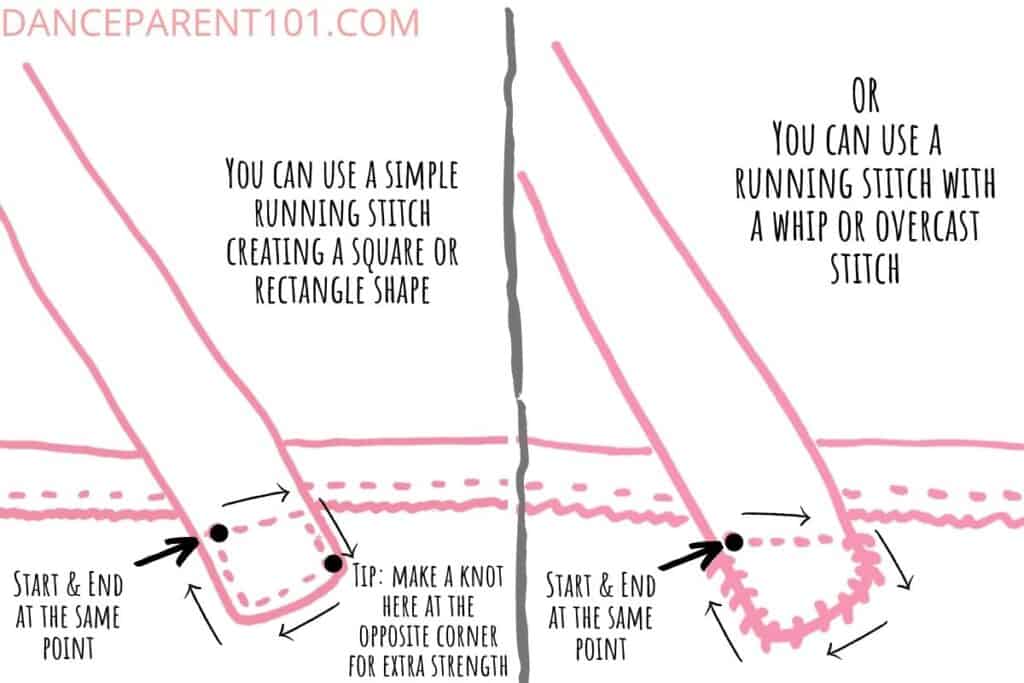
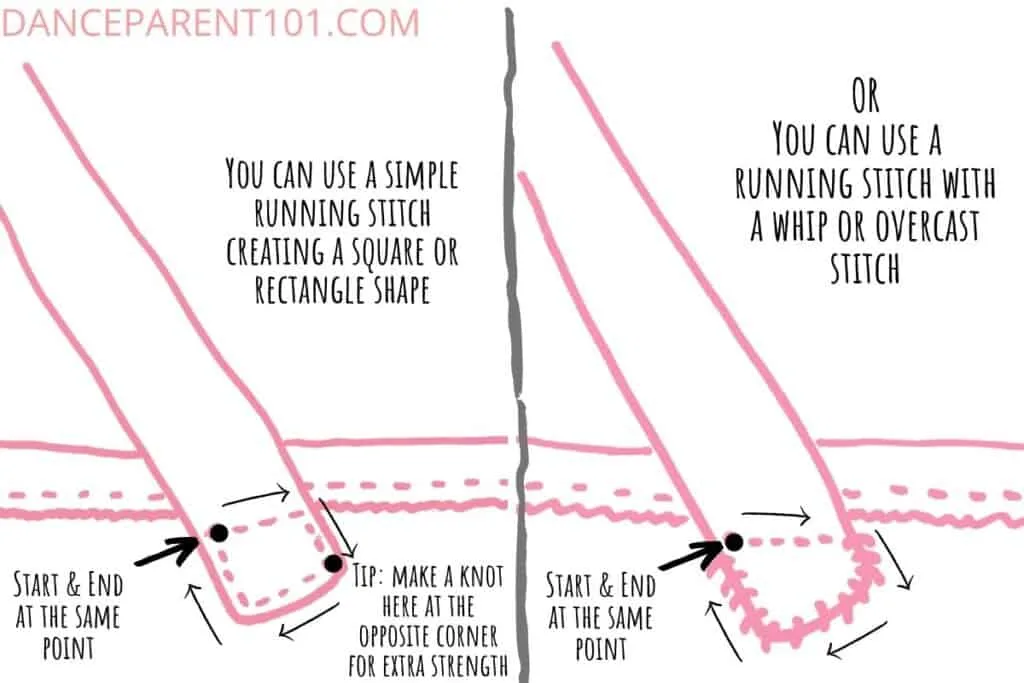
When sewing the ribbon onto the shoe you are going to make a rectangle shape with your stitches. You will go across the top, down one side, back across the bottom and then up the other side to meet where you started.
You will generally not sew your ribbons across the drawstring casings using this method but rather sew into the lining of the shoe which takes some practice so you do no go through the leather outer of the shoe. The lining is usually cotton or canvas which has been lightly glued to the leather so as you are sewing you may find your thread getting caught in some of this glue, causing your thread to catch and knot. Some people to combat this use dental floss instead of thread because it is strong and has a smooth coating over it which glides through the layers of material better. I have written about using dental floss further down in this article – but you can jump to that now by clicking here if you want and then scroll back up to continue the article.
I will admit sometimes my top row of stitches does go through the upper drawstring casing just under the row of stitches made by the manufacturer that attaches the casing to the shoe. This is not a problem and I find it is a good way to ensure the ribbons are attached to as much of the shoe as possible so they do not fall off or become loose.
Make sure when you are sewing the ribbon onto the shoe it is at approximately 60-45degree angle forwards so when you tie the ribbons there is no scrunching and they go nice and flat around the ankle.
6. Sew the rest of the ribbons onto the shoes.
Use this same method to sew the second ribbon on the opposite side of this shoe. Then go onto do the two ribbons on the other shoe in the same way.
7. Label your shoes L and R
I didn’t do this in the video, but you might want to label your shoes at this point left and right. You might just write an L and an R in a visible place inside the shoe with pen or permanent marker. Make sure whatever you use is meant to be used on fabric because you do not want the ink to transfer onto ballet tights through sweat and basic wear – which is why I tend to not do this step and just rely on the toe marks on my daughter’s shoe (where the big toe makes an indent in the shoe from wear) or how the ribbons do or do not do up properly when you put them on to know which foot each shoe goes on.
8. Trim your ribbons to length after trying them on.
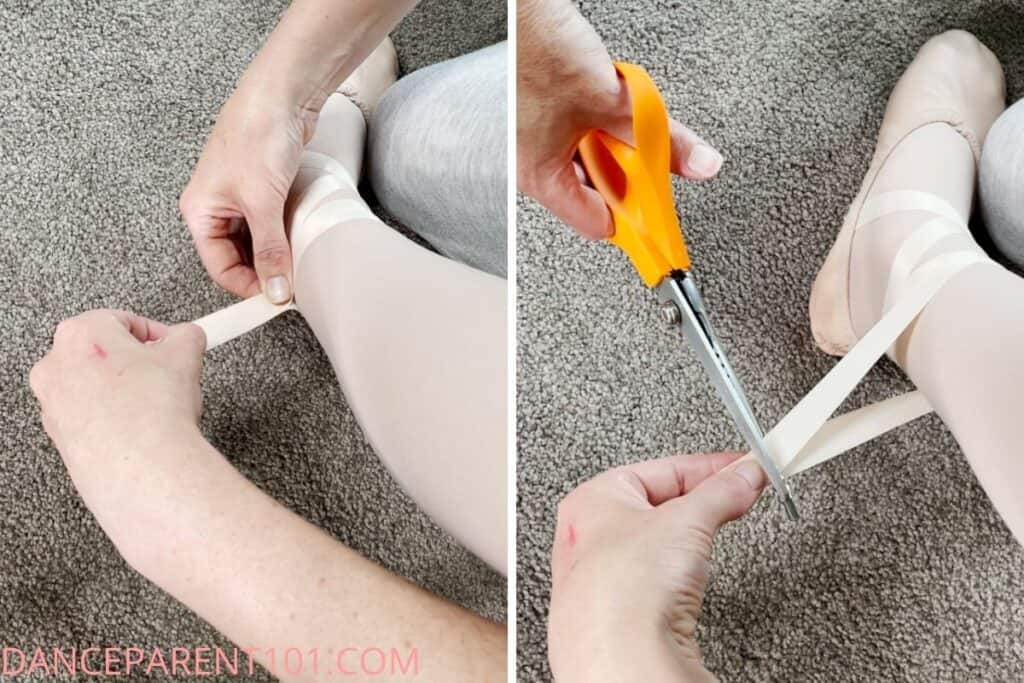

It is at this point that you will cut any extra and needed length off of each ribbon. You can do this in several ways.
- You can measure about 2 inches extra away from the ankle as I have done in the photo above or even better
- You can tie them up as you normally would with a double knot. Take your scissors and cut the ribbons so that you have about an inch leftover, just enough so you can comfortably tie the ribbons and make those loops and knots and to be able to hide the excess without too many lumps under the ankle ribbon.
IMPORTANT NOTE: It is always better to cut less off in the beginning than more and have more ribbon to tuck in for the first few wears than cutting too much off and having trouble tying them up properly. Trust me I should know as I did this to my daughter’s shoes and spent the next month (maybe more!!!) saying – I need to buy new ribbons until I finally had the time to do so!
You may notice after taking the shoes off that the ribbons are different lengths. This is fine because when you tie them one side goes around the ankle further than the other to be able to meet on the inner side of the ankle. They are not meeting in the middle behind the ankle, which means they will not be equal lengths. It does mean you will need to continue to wear them on the same foot each time otherwise they will not do up as you intend them to.
8. Burn or melt the ends of your ribbons to stop them fraying

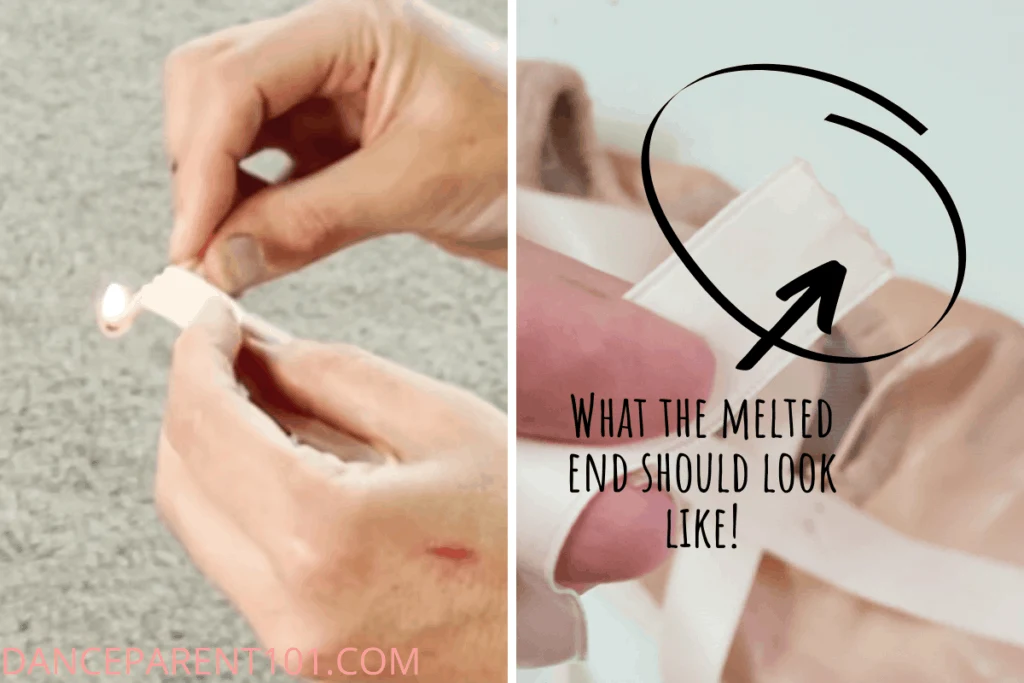
Once you have cut your ribbons the ends of them over time will start fraying unless you do something to prevent this from occurring. As your ribbons are made from a synthetic material you can use a flame to melt the ends into a plastic-like edge which will stop this from occurring.
Although I have written burn in the title of the instructions you don’t actually want to burn them turning them black. You merely want to melt the edges with a flame but the word burn helps to explain the process and create a visual in your mind which is why I used it. So to be able to melt the edges and not sear them black, you should try to keep the flame at a distance where the heat just starts to melt the edges of the ribbon. If you do burn them as I have done, the first few times I used this method, it is no big deal as these edges get tucked under the ribbon wrapped around the ankle anyway, but it just looks less obvious when they are only melted rather than burnt and tend to be a bit more malleable or soft when not completely burnt and therefor easier to manipulate and tuck into the ribbons wrapped around the ankle so they are no flapping around while dancing.
Another method I used when I was younger was to paint the edges of the ribbons with clear nail polish. I am pretty sure we did this as our ribbons were made from natural materials rather than polyesters and so would have caught on fire rather than melted if we had placed a flame on their edges. But it is still an effective method to stop fraying, as is using fabric glue to the edges and letting that dry or an antifray glue made for fabrics. But I do find that as you are moving your fingers quite often over the ends of the ribbons when you tie them and possibly because of the rubbing they receive when hidden, these glues wear off and need to be reapplied – but sometimes you don’t realize this until fraying has occurred, forcing you to cut your ribbons shorter making them harder to tie.
9. Your ballet shoes are ready to be worn!

Your flat ballet shoes should now be ready to wear and you will find using this method they will not need to be replaced for the life of the shoe – unless you trim them too short as I did, or if your child does not ribbon, but elastics instead which also happened to us last year!
In that case, I have a video you can watch on how to take your ribbons off your ballet shoes which you can watch below! And then more videos on how to attach elastics in this article on how to do that which you can read here!
More Interesting Facts and Information!!!
Your questions answered! I am sure that although by now you will be pretty confident and knowledgeable about what you have to do from watching the tutorial and reading the step-by-step instructions you still probably have a few questions! So I have answered some of the most popular ones below – so scroll down and see if the extra information you are after is here! If not use the contact form at the bottom of the page to reach me or DM through social media the user handle on most platforms is @danceparent101
Sewing Ribbons onto Leather Ballet Shoes VS Satin Pointe Shoes
You might watch other tutorials where people are sewing ribbons onto pointe shoes. They might sew through all the fabric layers of the pointe shoe or they might even sew the ribbons on the outside of the shoe rather than on the inside. Pointe shoes are generally replaced by ballet professionals and students after only a few uses – they, therefore, need extremely quick ways of sewing several pairs of ribbons on their shoes to be used during the week. Therefore those tutorials are good to watch and follow if you are sewing ribbons onto pointe shoes – not ballet flats. Ballet flats are usually made of leather whereas Pointe shoes are made from Satin – this means that you easily can sew through all the layers of a pointe shoe or even sew your ribbons on the outside which is fine for a week of rehearsals.
How do you sew Ribbons onto Canvas Ballet shoes?
You can attach ribbons to canvas ballet shoes, but it is not something you would normally have to do. Canvas ballet shoes are generally rehearsal and class shoes therefore elastics are generally used with these and you can check out my tutorials on how to sew elastics onto ballet shoes here.
With that being said, you might have a reason to have to sew ribbons onto canvas ballet shoes such as I did when my youngest daughter really really really wanted ribbons on her canvas ballet shoes as her older sister had them on her leather ones. But her shoes did not have a cotton inner lining and the result was holes or rips from where the stitches pulled at the canvas. I am not sure exactly how it happened, but it seems like the canvas just isn’t strong enough in this area on its own to hold the ribbons, especially when you pull them tightly around the foot. Not all the attachments ripped, one on each foot did. So if your canvas ballet shoes do not have any lining – that is another material between the sides of the foot and the canvas you may be better off sewing your ribbons along the drawstring casing thread line for stability just like most people who quickly sew their ribbons onto pointe shoes do!
How wide should ballet ribbons be?
Ballet ribbons for flat ballet shoes usually come in widths of between 15mm to 21mm wide or around 7/8inch. The thinner width (which I have seen at even being 12mm wide!) is better on children and the larger widths on teens and adults who are usually sewing their ribbons onto pointe shoes.
How long should ballet ribbons be?
You will generally need around 2.5yd or 90in or 2.2-2.5ms of ballet ribbon for two ballet shoes. You then cut this in half and then in half again leaving you with four pieces of about 22.5 inches long each or about 55cm long each. The finished length will be determined once you try your ballet shoes on and tie the ribbons after they have been sewed in place.
This is the length that is sold by most stores for adults so if you are buying ribbon for a child, you might find you can get away with less!
What are ballet ribbons made of?
Ballet Ribbons are made of polyester or nylon which is spun into satin. The satin can be shiny or matte or even have one shiny and one matte side or be double-sided. This is important to know as you generally sew your ribbons to show the shiny side when the ribbon is tied on the leg.
It is also important to know what your ballet ribbons are made of so you can safely burn their edges to stop them from fraying. Putting a flame close to the edge of ballet ribbons causes them to melt and stops them from fraying which is important otherwise they need to be constantly cut and start to lose their length and then need to be replaced.
Can I use tooth or dental floss to sew my on ballet ribbons?
You can use dental floss instead of cotton thread to sew your ribbons and many people who sew their ribbons onto their pointe shoes swear by and use tooth floss instead of cotton thread. This is because they change their pointe shoes often and need to sew their ribbons on quickly and using floss means they can do this with fewer stitches knowing those stitches will be strong. They also claim because it is coated to be smooth it gets stuck a lot less in the mixture of glue and canvas layers that make up the inner shoe. If you want to use floss instead of cotton go ahead, just make sure you secure your knots well because as it is coated, these are more likely to come loose over time – which is not a real issue if you are using your shoes for a week or even only one performance like professional Ballerina’s tend to!
Just an FYI on using floss – Sewing with dental floss also means your needle needs to be bigger to fit the floss through the eye of the needle which in turn will mean all your holes in your shoe will be wider.
What are Stretch or Elasticised Ballet Ribbons?
Stretch or elasticized ballet ribbons are ribbons that are made with spandex to make them stretchy like elastics. They can be used in the same way – cut into four and tied like ballet ribbons or they can be cut into two and sewn in place and then looped over the foot rather than tied. The biggest advantage I have heard and read about from those using stretch ribbons is that because they are elasticized they are softer and more forgiving around the Achilles tendon compared to regular ballet ribbons. For those looping them rather than tying them, I find I am still seeing those people sew on the traditional strong elastics to their pointe shoes, as pulling them over the shoe to loop them means they are loose, but use these to give the appearance of ribbons over the top of their elastics.
Some people love these and others feel you have to wrap them around the ankle quite a bit to make them tight as they are so stretchy making them look bulky so it is really personal preference to use them – but more people are beginning to use them with their pointe shoes rather than with flat ballet shoes in general.
Stretch or elasticized ballet ribbons are a little more expensive than traditional ribbons and do not usually come with your ballet shoes when purchasing new leather ballet shoes. I have also found that you might get less ribbon for example Bloch sells them in lengths of 2yards compared to their satin ribbons which they sell in 2.5 yards – but I guess this is because they stretch when you tie them and you need less.